Code examples
Note
Familiarity with TDT’s real-time processor visual design studio (RPvds) is required to follow the examples below. See the RPvds manual for more information.
Walkthrough of a simple play/record circuit
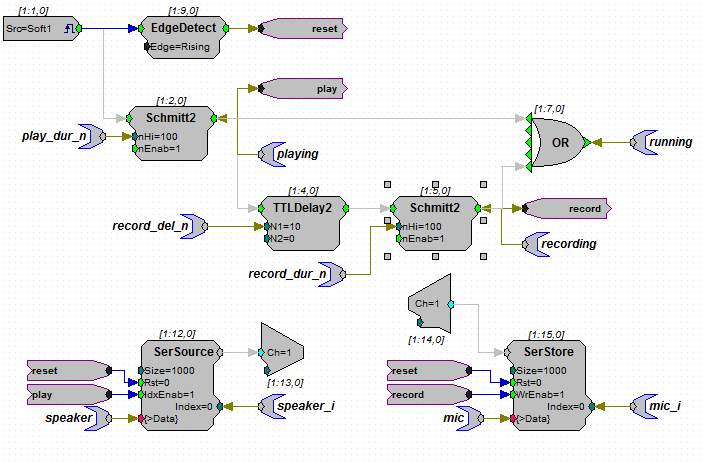
The following example is based on this RPvds circuit (download
circuit). If you wish to test the circuit you may need
to adapt it for your specific device (e.g. on the RX6 the correct input channel
for the microphone would be 128 and on the RZ6 you would use the AudioIn and
AudioOut macros). The specifics for each device are described in TDT’s System
3 manual.
Let’s start with a simple code example, using TDTPy, that loads a circuit and reads data from a buffer:
from numpy import arange, sin, pi
from tdt import DSPProject, DSPError
try:
    # Load the circuit
    project = DSPProject()
    circuit = project.load_circuit('record_microphone.rcx', 'RZ6')
    circuit.start()

    # Configure the data tags
    circuit.cset_tag('record_del_n', 25, 'ms', 'n')
    circuit.cset_tag('record_dur_n', 500, 'ms', 'n')

    # Compute and upload the waveform
    t = arange(0, 1, circuit.fs**-1)
    waveform = sin(2*pi*1e3*t)
    speaker_buffer = circuit.get_buffer('speaker', 'w')
    speaker_buffer.write(waveform)

    # Acquire the microphone data
    microphone_buffer = circuit.get_buffer('mic', 'r')
    data = microphone_buffer.acquire(1, 'running', False)
except DSPError, e:
    print("Error acquiring data: {}".format(e))
If you were to do the same thing using TDT’s ActiveX driver directly, the code would be much more verbose:
from win32com.client import Dispatch
try:
    # Load the circuit
    RX6 = Dispatch('RPco.X')
    if RX6.ConnectRX6('GB', 1) == 0:
        raise SystemError, "Cannot connect to hardware"
    if RX6.ClearCOF() == 0:
        raise SystemError, "Cannot connect clear device"
    if RX6.LoadCOF('record_microphone.rcx') == 0:
        raise SystemError, "Cannot load circuit"

    # Configure the data tags
    fs = RX6.GetSFreq()
    if RX6.SetTagVal('record_del_n', int(25e-3*fs)) == 0:
        raise SystemError, "Cannot set tag"
    if RX6.SetTagVal('record_dur_n', int(500e-3*fs)) == 0:
        raise SystemError, "Cannot set tag"
    if RX6.Start() == 0:
        raise SystemError, "Cannot start circuit"

    # Compute and upload the waveform
    t = arange(0, int(1*fs))/fs
    waveform = sin(2*pi*1e3*t)
    RX6.WriteTagV('speaker', 0, waveform)

    # Acquire the microphone data
    if RX6.SoftTrg(1) == 0:
        raise SystemError, "Cannot send trigger"
    last_read_index = 0
    acquired_data = []
    while True:
        if RX6.GetTagV('running') == 0:
            last_loop = True
        else:
            last_loop = False
        next_index = RX6.GetTagVal('mic_i')
        if next_index > last_read_index:
            length = next_index - last_read_index
            data = RX6.ReadTagV('mic', last_read_index, length)
        elif next_index < last_read_index:
            length_a = RX6.GetTagSize('mic') - last_read_index
            data_a = RX6.ReadTagV('mic', last_read_index, length_a)
            data_b = RX6.ReadTagV('mic', 0, next_index)
            data = np.concatenate(data_a, data_b)
        acquired_data.append(data)
        last_read_index = next_index
        if last_loop:
            break
    data = np.concatenate(acquired_data)
except SystemError, e:
    print("Error acquiring data: {}".format(e))
Compared with the code using the TDTPy module, code working with the ActiveX object directly requires a lot more boilerplate code.
Warning
Due to non-standard implementation of ActiveX in the TDT libraries, win32com defaults to an inefficient approach when calling certain methods in the ActiveX library. This results in a significant data transfer bottleneck. For more detail, and a description of how TDTPy solves this problem, see Brad Buran’s post.
Ok, let’s walk through the first example to illustrate how it works. First, we need to import everything we need:
from numpy import arange, sin, pi
from tdt import DSPProject, DSPError
Now, initialize the project and load the circuit, saved in a file named ‘record_microphone.rcx’ to the RZ6 DSP:
project = DSPProject()
circuit = project.load_circuit('record_microphone.rcx', 'RZ6')
Note that you can leave the default file extension off if desired. If the circuit is not in the current directory, you must provde an absolute or relative path to the circuit.
The circuit has the buffers mic and speaker as well as the tags
record_dur_n and record_del_n. Note that some tag names end in _n.
This is a special naming I use to remind myself what units these tags require
(‘n’ indicates number of ticks of the DSP clock while ‘ms’ indicates
milliseconds). Both mic and speaker have two supporting tags,
speaker_i and mic_i, respectively, that are used by TDTPy to determine
how much data is currently in the buffer.
The circuit is configured to deliver the data stored in the speaker buffer to DAC channel 1 (which is connected to a speaker) and record the resulting microphone waveform. The entire process is controlled by a software trigger.
We want to configure the microphone to record for a duration of 500 ms with a 25
ms delay. Remember that record_del_n and record_dur_n both require the
number of samples. Since number of samples depends on the sampling frequency of
the DSP, we have to convert our value, which is in millseconds, to the
appropriate unit using tdt.DSPCircuit.set_tag():
circuit.set_tag('record_del_n', int(25e-3*circuit.fs))
circuit.set_tag('record_dur_n', int(500e-3*circuit.fs))
Alternatively, we can use a convenience method, DSPCircuit.cset_tag(),
that handles the unit conversion for us (n is number of samples):
circuit.cset_tag('record_del_n', 25, src_unit='ms', dest_unit='n')
circuit.cset_tag('record_dur_n', 500, src_unit='ms', dest_unit='n')
Or, if we just rely on positional arguments (which we use in the example above):
circuit.cset_tag('record_del_n', 25, 'ms', 'n')
circuit.cset_tag('record_dur_n', 500, 'ms', 'n')
All three of the approaches are fine; however, we recommend that you use
DSPCircuit.cset_tag() whenever possible since this makes the code more
readable.
To write a 1 second, 1 kHz tone to the speaker buffer, we first generate the
waveform using the sampling frequency of the circuit. The sampling frequency is
available as an attribute, fs of the DSPCircuit class. A method,
DSPCircuit.convert() facilitates unit conversions that are based on the
sampling frequency of the circuit (e.g. duration*fs will convert duration, in
seconds, to the number of sample required for the waveform):
t = arange(0, circuit.convert(1, 's', 'n'))/circuit.fs
waveform = sin(2*pi*1e3*t)
Then we open the speaker buffer for writing and write the data to the buffer.
The first argument to DSPCircuit.get_buffer() is the name of the tag
attached to the {>Data} port of the buffer component and the second argument
indicates whether the buffer should be opened for reading (r) or writing (w):
speaker_buffer = circuit.get_buffer('speaker', 'w')
speaker_buffer.write(waveform)
Now that you’ve configured the circuit, you are ready to run it and record the
resulting waveform. The DSPBuffer.acquire() method will block until the
running tag becomes False then return the contents of the microphone
buffer:
microphone_buffer = circuit.get_buffer('microphone', 'r')
data = microphone_buffer.acquire(1, 'running', False)
Accessing the raw ActiveX object
Although DSPCircuit and DSPBuffer expose most of the functionality available via
the ActiveX object, there may be times when you need to access it directly. You
may obtain a handle to the object via tdt.util.connect_rpcox():
from tdt.util import connect_rpcox
obj = connect_rpcox('RZ6', 'GB')